2D Phong Illumination in WebGL
Suppose you’re rendering an uneven surface like a cobblestone floor, water or grass. You could just draw the details on a flat image by hand. This might look great from one particular angle, but if the player is moving around, the flatness of the image may be quickly exposed. This is exacerbated by the presence of lights, which will illuminate the surface as if it had just been painted on (which it sort of has been).
Another approach is to create lots of polygons and model the surface in 3D. This will solve the lighting problem (provided you have shaders aware of lighting), but as these surfaces can have lots of tiny details, that’s lots of work for you to define all the polygons, and lots of work for your GPU to draw them, and all you really gain is a nice aesthetic effect.
Another approach that is generally more efficient on graphics hardware is creating maps - buffers that store information about the details of a surface relevant to lighting. These maps correspond pixel by pixel to the texture being drawn onto the surface, and are used when shading fragments (pixels) to determine exactly how light should behave.
A demo that uses this technique is here.
For the tiles demo, I use two maps. The bump map stores the surface normal (vector at right angle to the surface at a point) and depth at every pixel on the screen (or every pixel in a tile since the tiles are repeated). The light map stores values indicating how reflective each pixel is to ambient, diffuse and specular lights.
Soon I’ll explain exactly how these maps work, but for it to make sense you need a crash course on lighting.
Crash course on lighting
I use a technique called Phong Illumination to light the scene. It combines ambient, diffuse and specular lighting at each pixel.
Ambient lighting is the same at every pixel. A scene has a global value representing the amount of ambient light present. Different surfaces may reflect a different amount of ambient light. It does not change with the viewing angle.

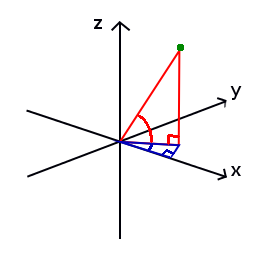
Diffuse lighting is light from a point light source hitting a surface and illuminating it. The amount of light reflected by a point on a surface is dependant on the angle between the light source and surface normal at that point. Here’s a diagram:
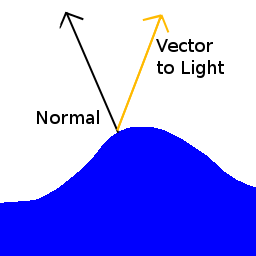
The more similar the two vectors, the brighter the light. This is computed in practice by multiplying the intensity of the light by the dot product of the two vectors. This value is then multiplied by the surface’s diffuse reflection coefficient, thus different surfaces may reflect a different amount of diffuse light. If there are multiple light sources in a scene, compute the diffuse intensity for each light and add them together.
Specular lighting computes the “shiny” bits of a surface. When you look at polished wood, metal or water, and see the really bright patches of light reflected on them, these are specular highlights. The intensity of specular lighting at a point is dependent on the difference between the angle from a ray reflected from the light at that point and a vector from that point to the eye. In the diagram below, the relevant vectors are coloured red and green.
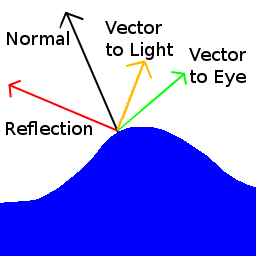
The intensity of the light is the dot product of the two relevant vectors raised to some power. The higher the power, the smaller and more intense the highlights appear, and thus the shinier the surface looks. Multiply this value by the surfaces specular reflection coefficient and light brightness. If there are multiple specular lights in an area, compute the specular intensity for each and add them together.
Once the intensity of each type of lighting is computed for a point, just add them all together to get the total lighting at that point. In the tile example, I add the ambient and diffuse lighting first, multiply this by the colour of the pixel (given by the texture) treating the (r, g, b, a) values as a 4D vector, then add on the specular lighting as a vector (i, i, i, 0) where ‘i’ is the specular light intensity. This is because I wanted the specular highlights to appear white rather than draw from the underlying colour.
Map Encoding Scheme
I store maps in bitmap files that I made using GIMP. Information is encoded in the rgb values of each pixel. Each channel (red, green, blue) of a pixel is represented by a single byte. Thus there are 256 values (0-255) that can be stored in a channel of a pixel.
There are actually 4 images that get combined into making the tile demo. These are:
- texture
- bump map
- light map
- shine map
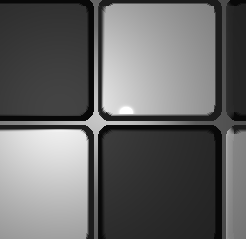
Tile Texture

A simple texture. It’s used to determine the colour of each pixel.
Bump Map
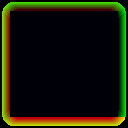
For each pixel, this encodes the surface normal vector and depth at that pixel. Normal vectors are represented by a pair of angles. The diagram below shows the pair of angles used to represent the green point. The horizontal angle is blue and the vertical angle is red. The vertical angle in this system is constrained between 90° and -90°. As the tile scene is viewed from above, for the purposes of this example, the vertical angle will be constrained between 90° and 0°. The length of normal vectors is always 1.
Different information is encoded in each channel, so it makes sense to examine one channel at a time.
Red (Horizontal Angle)

This channel encodes the horizontal angle of the surface normal. A value of 0 denotes 0°, 64 (256/4) denotes 90° (360°/4) and so on. This is why the right side of the red image is black - the horizontal angle of the normal is 0°.
Green (Vertical Angle)
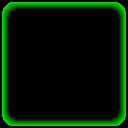
This channel encodes the vertical angle of the surface normal. Values are linearly interpolated between 0° and 90°. 0° indicates a vertical normal. The middle and edges of the image are black because the surface normal is straight up.
Blue (Depth)

The image above is slightly blue though it’s hard to see. It represents the height in pixel-sized units of each pixel. Heights of tiles range from 0 to 8 pixels, so the blue-est colour in that picture is rgb(0, 0, 8) which looks almost black.
Light Map

This stores the ambient, diffuse and specular reflection coefficients in the red, green and blue channels respectively.
Red (Ambient)

Green (Diffuse)

Blue (Specular)

The grout between tiles isn’t very shiny, so it has a low specular reflection coefficient
Shine Map
This indicates how shiny each pixel is. It is used to determine the specular exponent (the power to which the dot product is raised wen computing specular lighting). Only one channel is used for this, and values can range from 0 to 255.
